DevOps | 基于 Drone CI 部署 Go 语言项目 — Web Server

Contents
前面完成了基础设施搭建和测试,接下来就该将 Drone CI/CD 应用到项目中了。 这里涉及到的前几篇内容有:
简介
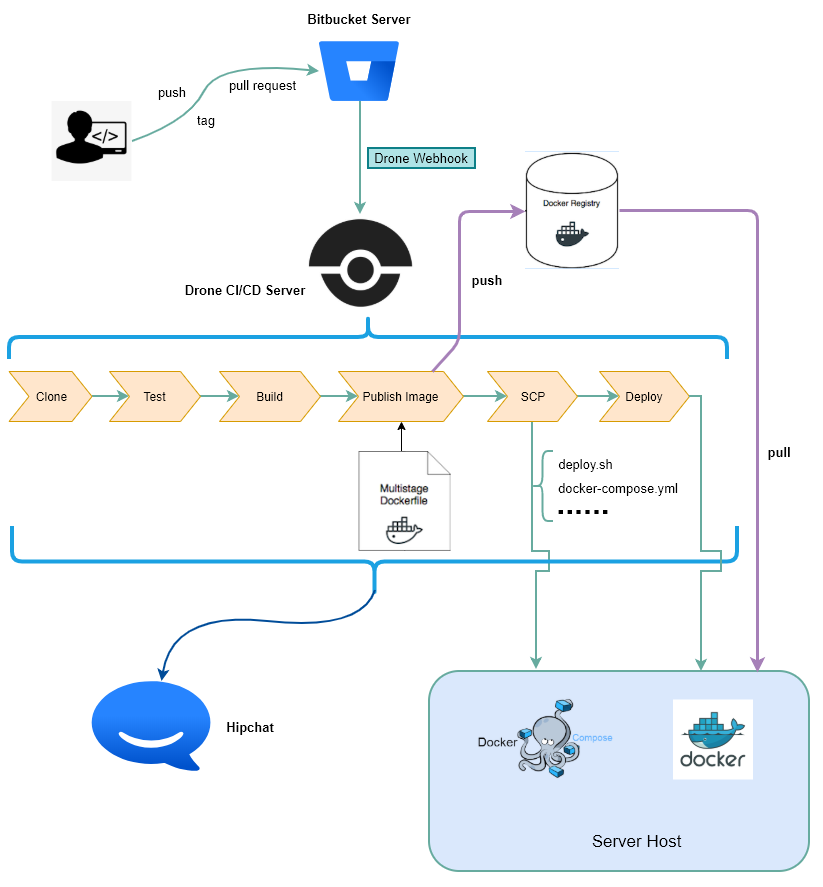
这里以一个 Golang 项目(Go-Web-App)为例,基于 Drone CI 服务完成其自动化部署工作流的配置和演示:主要步骤包含:
clone => test => build => image => deploy => notify
包含开发的完成流程说明:
- 开发项目代码, 包括源码文件,
.drone.yml文件、Dockerfile 文件等配置文件和一系列执行脚本(*.sh) - 提交代码:
push、pull request、tag到代码仓库(Bitbucket Server), 通过 Webhook 触发 Drone 的 Pipeline - Drone 开始 Pipeline 的执行
- Clone 代码至容器(Drone 默认执行)
- 执行单元测试
- 编译代码,构建生成可执行程序
- 构建 Docker 镜像,并发布到 Docker Registry
- 打包资源文件、执行脚本、配置文件等到远程测试服务器
- 部署应用容器到测试环境
- 结果通知
Note: Drone 引入了 pipeline 的概念,上述整个构建过程由多个 stage 组成,每一个 stage 都是在一个 Docker 容器内执行:
- 各 stage 间可以通过共享宿主机的磁盘目录, 实现 build 阶段的数据共享和缓存基础数据, 实现加速下次 build 的目标
- 各 stage 也可以共享宿主机的 docker 环境,实现共享宿主机的 docker image, 不用每次 build 都重新拉取 base image,减少 build 时间
- 可以并发运行。多个 build 可以并发运行,单机并发数量由服务器 cpu 数决定
准备 Go-Web-App 演示项目
Go-Web-App Demo Project 简介:
- 由 Golang 实现一组 RESTFul API
- 由 Gorilla Mux 提供路由
- 由 MongoDB 提供数据存储服务
准备 Go-Web-App 项目:
创建源码根目录
1
2
$ cd /home/workspace/code/bitbucket/ $ mkdir goweb-app && cd goweb-app- 初始化工程
1
2
3
4
5
6
7
$ git init $ touch .gitignore README.md $ echo .idea >> .gitignore $ git add --all $ git commit -m "Initial Commit" $ git remote add origin http://admin@<_bitbucket_server_>.com:7990/scm/sof/goweb-app.git $ git push -u origin master- 初始化工程
添加源码文件
1
2
3
4
$ mkdir api cicd www # - cicd:存放 Drone CI 服务的相关配置文件和脚本 # - www: 存放网站资源 $ touch api/app.go api/model.go main.go main_test.go源码内容可以 Click Here 进行拷贝。
初始化 go module 并运行项目
1
2
3
4
5
6
$ go mod init go-web $ go run . go: finding github.com/gedex/inflector latest go: finding gopkg.in/mgo.v2 latest 2018/10/31 16:03:14 mgo listen and serve on [mgo, localhost:27017] 2018/10/31 16:03:14 api listen and serve on [:8090]项目创建完成后先提交代码到源码库
1$ git add -A && git commit -m "initial project" && git push此时的项目结构为:
 1
 2
 3
 4
 5
 6
 7
 8
 9
10
11
goweb-app/ |-- README.md |-- api | |-- app.go | `-- model.go |-- go.mod |-- go.sum |-- main.go `-- main_test.go 1 directory, 7 files
配置 Drone CI/CD 服务
需要提前阅读的相关文档:
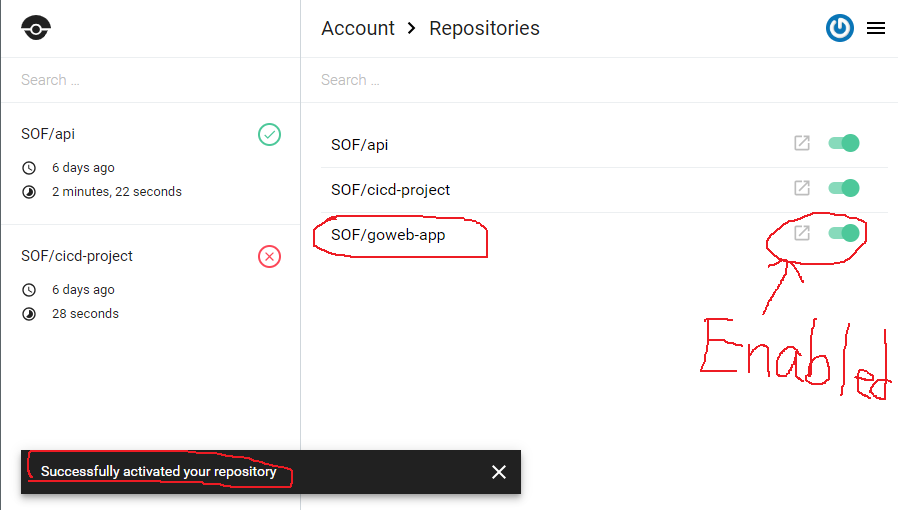
在项目 根目录 创建 Drone CI/CD 的配置文件:.drone.yml;然后跳转到 Drone Web UI:http://your_company_domain.com:8000,完成登陆后 Drone Server 会自动同步你的账号下面的项目列表(或者手动同步)。然后选择需要启用 Drone CI 的项目,点击右侧开关选项即可启用。如下图:
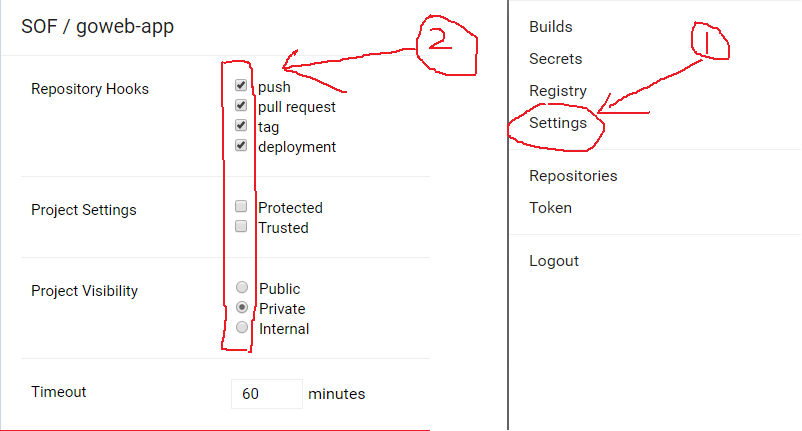
最后,需要在 Drone Web UI 管理界面,找到 goweb-app 的设置选项,开启 Repo Hooks,如下图:
Drone Pipeline: 单元测试(test)
Go-Web-App 的接口单元测试依赖于 MongoDB 数据库服务,因此在配置 pipeline: test 前需要先配置好 services
需要提前阅读的相关文档:
此时
.drone.yml配置如下:1 2 3 4 5 6 7 8 9 10 11 12 13 14 15 16 17 18 19 20 21 22 23 24 25 26 27 28 29 30 31 32 33 34 35 36 37 38workspace: base: /go path: src/repo/goweb-app clone: # Clone code from bitbucket git: image: plugins/git depth: 50 tags: true pipeline: ping: # Mgo-server for testing restful api image: mongo:latest commands: - sleep 3 - mongo --host mgo --eval "{ping:1}" test: # Golang unit testing image: golang:latest group: build environment: - BRC=${DRONE_COMMIT_BRANCH} - SHA=${DRONE_COMMIT_SHA:0:8} - EVN=${DRONE_BUILD_EVENT} - MSG=${DRONE_COMMIT_MESSAGE} - TAG=${DRONE_TAG} - MGO=mgo:27017 commands: - cd cicd - /bin/sh test_api.sh $MGO $BRC $SHA $EVN $MSG $TAG services: # Dependent service mgo: image: mongo:latest branches: # Enable Drone CICD on: master & release/* branches include: [ master, release/* ]Note:
- workspace 定义了所有工作流步骤共享的容器空间和目录
- clone 部分是默认配置, 也可以自定义
- Pipeline:
pingstage 放在第一步是用来验证 mgo services 已经可以正常提供服务了 - 命令
mongo --host mgo --eval "{ping:1}的选项--host的值填写services部分配置的名称,即:mgo - 官网的
--eval "{ ping: 1 }"会导致错误,需改成--eval "{ping:1}" ${DRONE_COMMIT_BRANCH}等一系列预设变量可用来动态配置 pipelines- commands 部分如果内容过多或想让
.drone.yml配置变得简洁时,可用脚本实现 - services 部分用来定义服务应用容器,例如:database、cache、redis等
- branches 部分可以用来限定 Drone CI 作用在那些分支上(这里只作用在:master 和 release/* 开头的所有分支上)
- 添加脚本
test_api.sh:
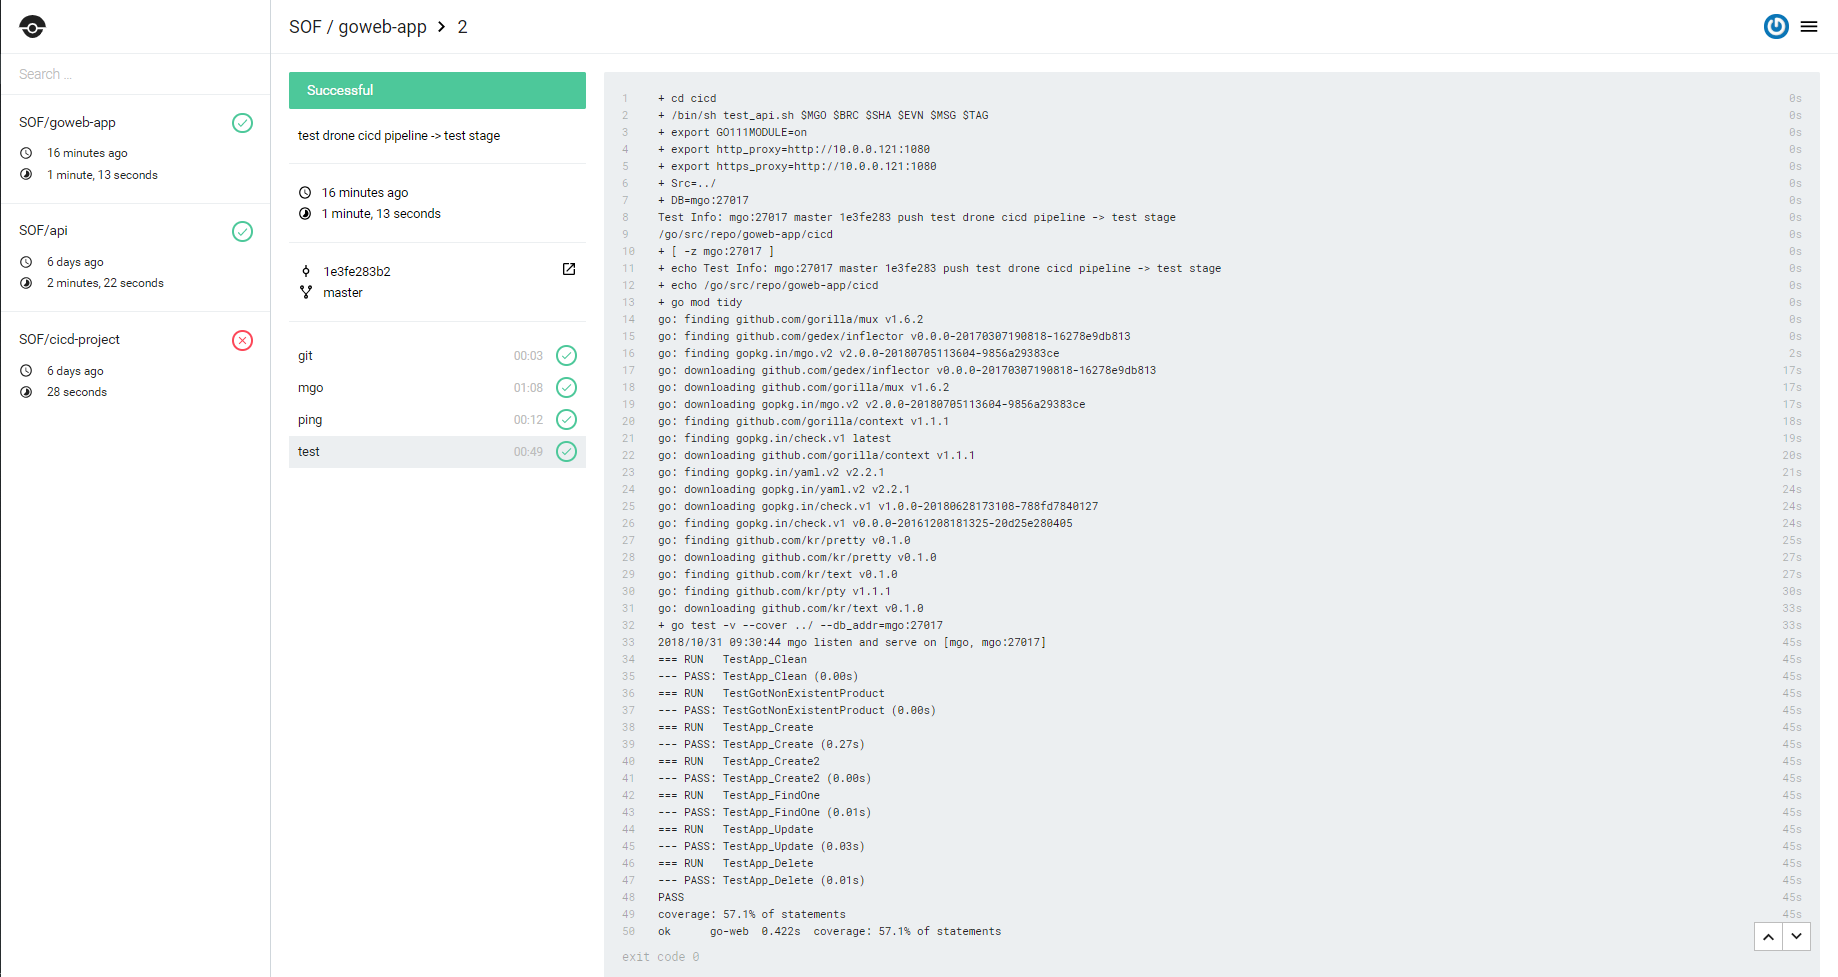
1 2 3 4 5 6 7 8 9 10 11 12 13 14 15 16 17 18 19 20 21 22 23 24 25 26 27 28 29 30 31 32 33 34 35 36 37 38 39 40 41 42 43# 进入项目根目录,创建 cicd 目录用来存放 Drone 执行时的一些脚本和配置文件 $ cd goweb-app && mkdir cicd # 创建 test_api.sh $ touch test_api.sh # 脚本内容如下: #!/bin/sh # # Program: API 单元测试脚本 # Authors: zhangzhe # History: # 2018-10-24:编写脚本实现 # # Pre Set set -x # Set ENV export GO111MODULE=on # Go1.11.x 版本需要开启 export http_proxy=http://10.0.0.121:1080 export https_proxy=${http_proxy} # Set Var Src=../ # 程序源码 DB=$1 # Database Server Address if [ -z $1 ]; then DB=mgo:27017 fi # Golang Test echo Test Info: $@ # 打印构建信息, 脚本执行参数 # ${DRONE_COMMIT_BRANCH} # ${DRONE_COMMIT_SHA:0:8} # ${DRONE_BUILD_EVENT} # ${DRONE_COMMIT_MESSAGE} # ${DRONE_TAG} echo $PWD go mod tidy # 解决依赖包 go test -v --cover ${Src} --db_addr=${DB} # 'mgo:27017' Drone 提供的数据库服务 # 'localhost:27017' 宿主机提供的数据库服务Now, 提交代码进行测试(备注:Drone CI/CD 设定只在 master 和 以 release/ 开头的分支起作用)
1$ git add -A && git commit -m "test drone cicd pipeline -> test stage" && git push- 构建结果如下图:
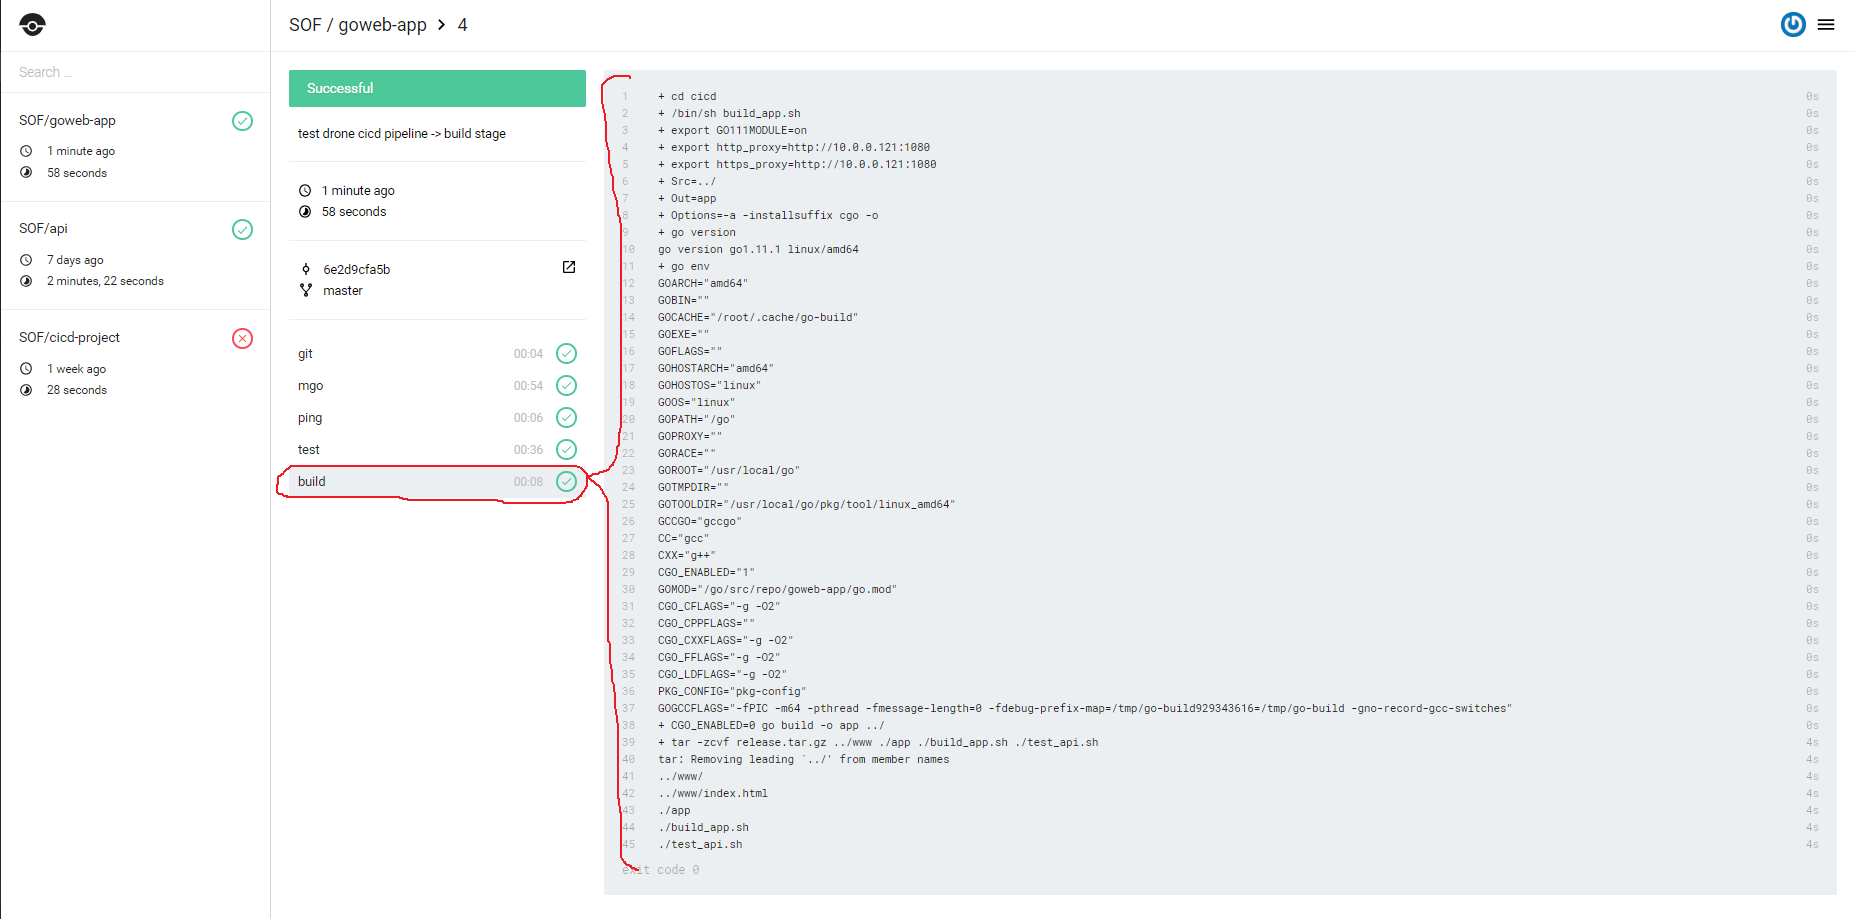
Drone Pipeline: 构建 Go-Web-App(build)
单元测试执行完成后,就可以进入
build阶段来构建可执行程序了。- 此时的
.drone.yml配置如下:
1 2 3 4 5 6 7 8 9 10 11 12 13 14 15 16 17 18 19 20 21 22 23 24 25 26 27 28 29 30 31 32 33 34 35 36 37 38 39 40 41 42 43workspace: base: /go path: src/repo/goweb-app clone: # Clone code from bitbucket git: image: plugins/git depth: 50 tags: true pipeline: ping: # Mgo-server for testing restful api image: mongo:latest commands: - sleep 3 - mongo --host mgo --eval "{ping:1}" test: # Golang unit testing image: golang:latest group: build environment: - BRC=${DRONE_COMMIT_BRANCH} - SHA=${DRONE_COMMIT_SHA:0:8} - EVN=${DRONE_BUILD_EVENT} - MSG=${DRONE_COMMIT_MESSAGE} - TAG=${DRONE_TAG} - MGO=mgo:27017 commands: - cd cicd - /bin/sh test_api.sh $MGO $BRC $SHA $EVN $MSG $TAG + build: # Build go app and package source files + image: golang:latest + commands: + - cd cicd + - /bin/sh build_app.sh services: # Dependent service mgo: image: mongo:latest branches: # Enable Drone CICD on: master & release/* branches include: [ master, release/* ]构建可执行程序的具体步骤由脚本:build_app.sh 定义,内容如下:
1 2 3 4 5 6 7 8 9 10 11 12 13 14 15 16 17 18 19 20 21 22 23 24 25 26 27 28 29 30 31 32 33 34 35 36 37 38# 进入项目根目录,创建 cicd 目录用来存放 Drone 执行时的一些脚本和配置文件 $ cd cicd # 创建 build_app.sh $ touch build_app.sh # 脚本内容如下: #!/bin/sh # # Program: 构建 Go-App & 打包资源文件 # Authors: zhangzhe # History: # 2018-10-24:编写脚本实现 # # Pre Set set -x # Set ENV export GO111MODULE=on # Go1.11.x 版本需要开启 export http_proxy=http://10.0.0.121:1080 export https_proxy=${http_proxy} # Set Var Src=../ # 程序源码 Out="app" Options="-a -installsuffix cgo -o" # PreSet='GOOS=linux GOARCH=amd64' # 构建变量设置 # Build go version go env CGO_ENABLED=0 go build -o ${Out} ${Src} # build # Package tar -zcvf release.tar.gz ../www ./*Note:
- build_app.sh 脚本的最后一行用来打包资源文件(网站资源、配置文件和脚本等),该资源文件最终需要上传到远程服务器
- 最后,在创建
www目录用来测试静态页面:
1 2 3 4 5 6 7 8 9 10 11 12 13 14 15# 进入项目根目录,创建 www 目录 $ cd goweb-app && mkdir www # 创建 index.html 静态页面 $ touch www/index.html # 填入如下内容: <!DOCTYPE html> <html> <body> <h1>I'm zher.</h1> </body> </html>Now, 提交代码进行测试(备注:Drone CI/CD 设定只在 master 和 以 release/ 开头的分支起作用)
1$ git add -A && git commit -m "test drone cicd pipeline -> build stage" && git push- 构建结果如下图:
Drone Pipeline: 发布 Docker 镜像(image)
这里 Docker 镜像是发布到自建的 Docker Registry Server 的,其部署文档参考:Docker | Deploy Docker Registry and Web UI
- 生成 Go-Web-App 的可执行文件后,就可以将其打包为 Docker Image 发布了,此时的
.drone.yml配置如下:
1 2 3 4 5 6 7 8 9 10 11 12 13 14 15 16 17 18 19 20 21 22 23 24 25 26 27 28 29 30 31 32 33 34 35 36 37 38 39 40 41 42 43 44 45 46 47 48 49 50 51 52 53 54 55workspace: base: /go path: src/repo/goweb-app clone: # Clone code from bitbucket git: image: plugins/git depth: 50 tags: true pipeline: ping: # Mgo-server for testing restful api image: mongo:latest commands: - sleep 3 - mongo --host mgo --eval "{ping:1}" test: # Golang unit testing image: golang:latest group: build environment: - BRC=${DRONE_COMMIT_BRANCH} - SHA=${DRONE_COMMIT_SHA:0:8} - EVN=${DRONE_BUILD_EVENT} - MSG=${DRONE_COMMIT_MESSAGE} - TAG=${DRONE_TAG} - MGO=mgo:27017 commands: - cd cicd - /bin/sh test_api.sh $MGO $BRC $SHA $EVN $MSG $TAG build: # Build go app and package source files image: golang:latest commands: - cd cicd - /bin/sh build_app.sh + image: # Build image and publish to private registry + image: plugins/docker + repo: repo.company.com:5000/go-app + registry: repo.company.com:5000 + secrets: [ docker_username, docker_password ] + context: ./cicd/ + dockerfile: ./cicd/Dockerfile + default_tags: true + when: + event: tag services: # Dependent service mgo: image: mongo:latest branches: # Enable Drone CICD on: master & release/* branches include: [ master, release/* ]Note:
image 阶段使用了插件:plugins/docker 来构建 Docker Image 且将其发布到指定的远程 Docker Registry, 详细说明可以查阅其文档
image 阶段限制只在
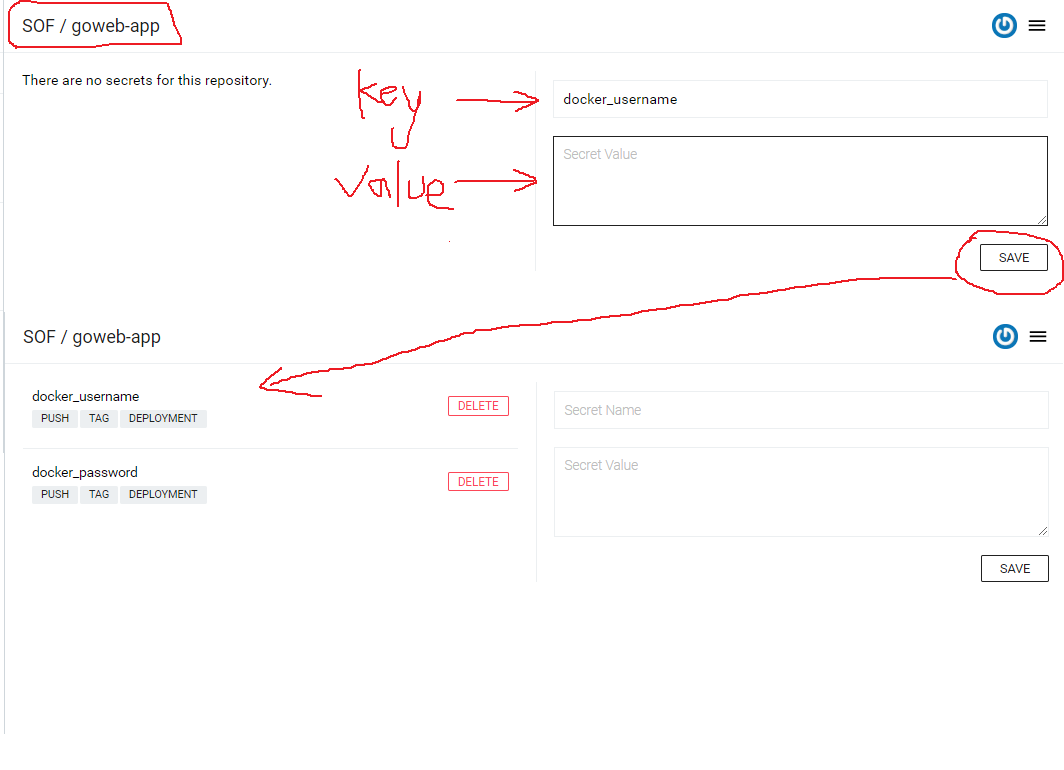
tag事件被触发式才执行 Docker Image 构建和发布secrets 选项中的
docker_username & docker_password是 Drone 注入的,我们需要在提前在 Drone Web 端先设置好这些 secrets,如下图:

构建镜像的 Dockerfile 内容如下:
1 2 3 4 5 6 7# 进入项目根目录,创建 cicd 目录用来存放 Drone 执行时的一些脚本和配置文件 $ cd cicd # 创建 Dockerfile $ touch Dockerfile # 填入以下内容:1 2 3 4 5 6 7 8 9 10 11 12 13 14 15 16 17 18 19 20 21 22 23 24 25 26 27 28 29 30 31 32 33 34 35 36 37 38 39 40 41 42 43# Program: Dockerfile for API Service # Build: # docker build -t <image_name> . # 基础镜像 # Usage: FROM image:tag FROM repo.company.com:5000/alpine:3.8 # 设置环境变量 # Usage: ENV <key=value> <key=value> ENV WorkDir=/home/api # 指定维护者信息 # Usage: MAINTAINER name MAINTAINER <xxx@xxx.com> # 给镜像添加工作目录 # Usage: RUN [命令] # RUN mkdir -p ${WorkDir}} # Set Time Zone RUN echo 'http://mirrors.ustc.edu.cn/alpine/v3.5/main' > /etc/apk/repositories \ && echo 'http://mirrors.ustc.edu.cn/alpine/v3.5/community' >> /etc/apk/repositories \ && apk update && apk add tzdata \ && ln -sf /usr/share/zoneinfo/Asia/Shanghai/etc/localtime \ && echo "Asia/Shanghai" > /etc/timezone # 设定默认工作路径 # Usage: WORKDIR [path] WORKDIR ${WorkDir} # 复制本地应用程序文件[src]到Container的工作目录[dst] # Usage: COPY [src] [dst] COPY app ${WorkDir}/ RUN chmod +x ${WorkDir}/app # 容器暴漏给外侧的端口号 # Usage: EXPOSE port [port...] EXPOSE 80 # 指定容器启动时执行的命令 # Usage: CMD ["executable", "param1", "param2"] CMD ["./app"]Note:
- Dockerfile 中的基础镜像使用的是 alpine, 这里将 alpine:3.8 上传到我们自建的 Docker Registry 以节省构建时间。如果使用 Docker Hub 中的镜像每次都要拉取一次,会很慢。
上传构建 Go-Web-App 的基础镜像到我们自建的 Docker Private Registry:
-
1 2 3 4 5$ docker pull alpine:3.8 $ docker tag alpine:3.8 repo.company.com:5000/alpine:3.8 $ docker push repo.company.com:5000/alpine:3.8 # push 失败时,尝试重新登陆后继续 push 即可Push
repo.company.com:5000/alpine:3.8成功后,可以打开 Docker Registry UI (http://your_domain.com:5001) 即可看到刚刚提交的镜像信息。
-
Now, 提交代码进行测试(备注:Drone CI/CD 设定只在 master 和 以 release/ 开头的分支起作用)
1 2 3 4$ git add -A && git commit -m "test drone cicd pipeline -> publish image stage" && git push # 打 tag, 触发 when: [event: tag] 事件,即触发 publish_image 阶段执行 $ git tag 0.0.1 -m "release 0.0.1" && git push origin 0.0.1- 构建结果如下图:
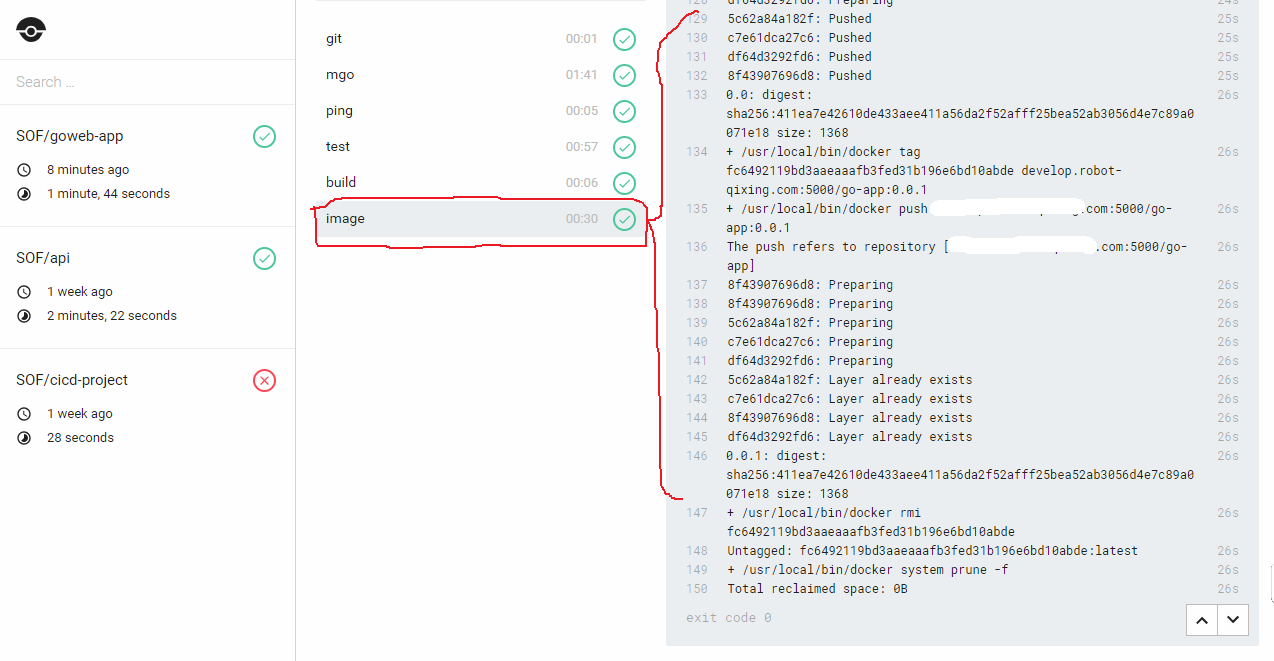
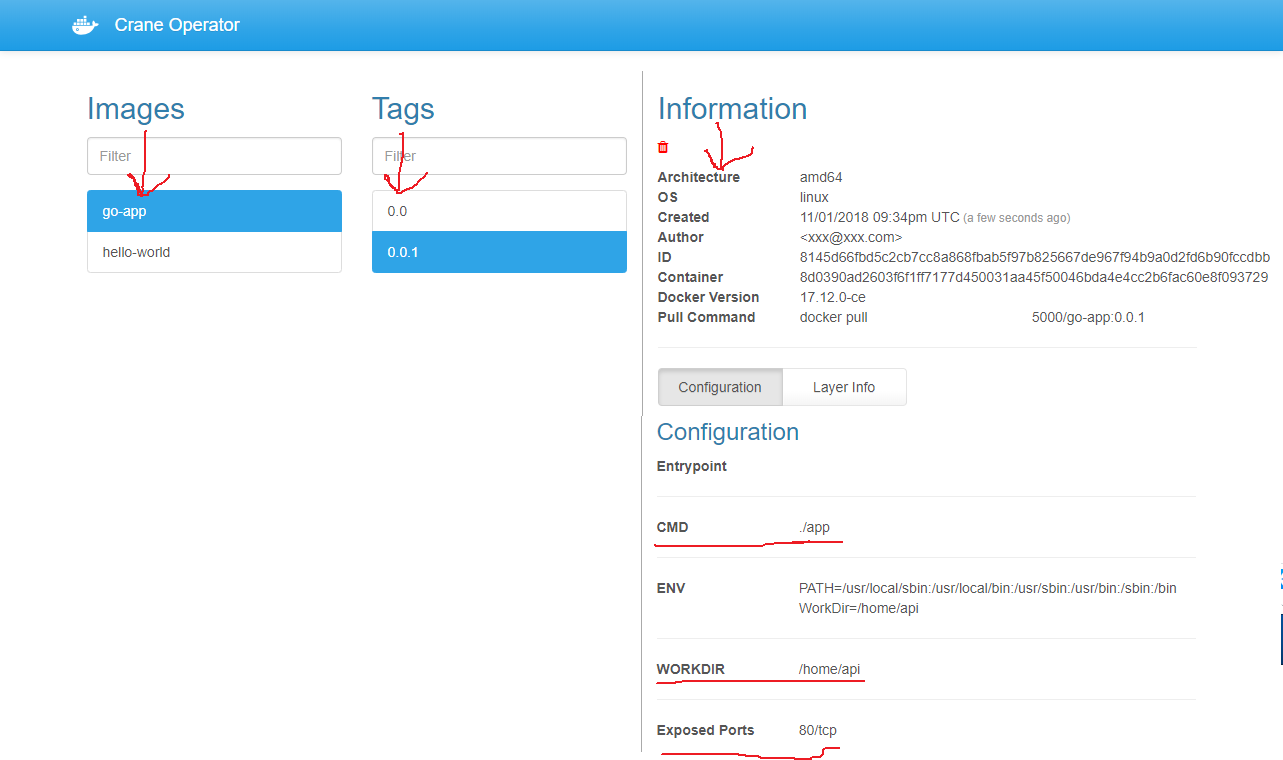
- 执行完成后可以打开 Docker Registry UI:http://your.domain.com:5001 看到刚刚构建好的镜像
Drone Pipeline: 上传静态资源和部署脚本(scp)
要实现自动部署容器服务,光有镜像是不够的,因此,还需要将网站资源,配置文件等一些脚本打包发到远端服务器上.
- 此时的
.drone.yml配置如下:
1 2 3 4 5 6 7 8 9 10 11 12 13 14 15 16 17 18 19 20 21 22 23 24 25 26 27 28 29 30 31 32 33 34 35 36 37 38 39 40 41 42 43 44 45 46 47 48 49 50 51 52 53 54 55 56 57 58 59 60 61 62 63 64 65 66 67 68workspace: base: /go path: src/repo/goweb-app clone: # Clone code from bitbucket git: image: plugins/git depth: 50 tags: true pipeline: ping: # Mgo-server for testing restful api image: mongo:latest commands: - sleep 3 - mongo --host mgo --eval "{ping:1}" test: # Golang unit testing image: golang:latest group: build environment: - BRC=${DRONE_COMMIT_BRANCH} - SHA=${DRONE_COMMIT_SHA:0:8} - EVN=${DRONE_BUILD_EVENT} - MSG=${DRONE_COMMIT_MESSAGE} - TAG=${DRONE_TAG} - MGO=mgo:27017 commands: - cd cicd - /bin/sh test_api.sh $MGO $BRC $SHA $EVN $MSG $TAG build: # Build go app and package source files image: golang:latest commands: - cd cicd - /bin/sh build_app.sh image: # Build image and publish to private registry image: plugins/docker repo: repo.company.com:5000/go-app registry: repo.company.com:5000 secrets: [ docker_username, docker_password ] context: ./cicd/ dockerfile: ./cicd/Dockerfile default_tags: true when: event: tag + scp: # Upload resource and config files to remote server + image: appleboy/drone-scp + group: build + host: + - your_server_address + username: root + port: 22 + secrets: [ ssh_password ] + target: /home/workspace/service/api-server # 远程服务器目录 + source: ./cicd/release.tar.gz # 打包好的文件 + when: + event: tag services: # Dependent service mgo: image: mongo:latest branches: # Enable Drone CICD on: master & release/* branches include: [ master, release/* ]Note:
- 预设变量
ssh_password也需要提前在 Drone Web 端设置好
部署脚本
deploy_services.sh内容如下:1 2 3 4 5 6 7 8 9 10 11 12 13 14 15 16 17 18 19 20 21 22 23 24 25 26 27 28 29 30 31 32 33 34 35 36 37 38 39 40 41 42 43 44 45# 进入项目根目录,创建 cicd 目录用来存放 Drone 执行时的一些脚本和配置文件 $ cd cicd # 创建部署脚本:deploy_services.sh $ touch deploy_services.sh # 填入如下内容: #!/bin/sh # # Program: 部署 Docker 容器服务 # Authors: zhangzhe # History: # 2018-10-24:编写脚本实现 # # Pre Set set -x # Set Var Tag=$1 # 读取 git tag (版本号:x.y.z) Commit=$2 # 读取 git commit 号(8位) if [ -z ${Tag} ]; then echo -e "Empty git tag given" exit 1 fi ImageName=go-app:${Tag} # 镜像名 Registry=develop.robot-qixing.com:5000 # 私有仓库地址 BaseImage=${Registry}/${ImageName} # 远程 Image 地址:docker pull ${BaseImage} ContainerName=api${Tag} # Reconfigure docker-compose.yml & Caddyfile sed -i "s/api(@tag)/${ContainerName}/g" docker-compose.yml # 启动对应版本(Tag)的 API 容器 sed -i "s/(@tag)/${Tag}/g" dockere-compose.yml # 拉去对应版本(Tag)的 API 镜像 sed -i "s/api(@tag)/${ContainerName}/g" Caddyfile # Caddy 代理到对应版本的 API 容器服务 # Pull image and run docker container docker pull ${BaseImage} docker-compose up -d docker ps docker-compose logs caddy docker-compose logs mgo docker logs api${Tag}配置 docker-compose.yml
开始之前需要阅读的相关文档:
docker-compose.yml 配置内容如下:
1 2 3$ cd cicd && touch docker-compose.yml # 填入如下内容1 2 3 4 5 6 7 8 9 10 11 12 13 14 15 16 17 18 19 20 21 22 23 24 25 26 27 28 29 30 31 32 33version: '3' services: caddy: # caddy proxy server container_name: caddy image: abiosoft/caddy:latest restart: always ports: - 80:80 - 443:443 volumes: - /etc/ssl/server-certs:/root/.caddy - ./Caddyfile:/etc/Caddyfile - ./www:/srv depends_on: - api api: # api server container_name: api(@tag) image: repo.company.com:5000/go-app:(@tag) restart: always command: './app --port=80 --db_addr=mgo:27017' depends_on: - mgo mgo: # mgo server container_name: mgo image: mongo:latest restart: always environment: MONGO_INITDB_ROOT_USERNAME: <__input_username__> MONGO_INITDB_ROOT_PASSWORD: <__input_password__> volumes: - ./mgo-data/db:/data/db- Caddyfile 配置内容如下:
1 2 3$ cd cicd && touch Caddyfile.yml # 填入如下内容1 2 3 4 5 6 7 8 9 10 11 12 13 14 15 16 17 18 19 20 21https://company-domain.com { gzip root /srv tls /root/.caddy/cert.crt /root/.caddy/cert.key timeouts none proxy /v0 api(@tag):80 { transparent websocket except static } cors /v0 { origin * methods POST,GET,PATCH,DELETE,OPTIONS allow_credentials false max_age 3600 allowed_headers content-type,Authorization exposed_headers X-Something-Special,SomethingElse,Authorization } }Note:
- docker-compose.yml 和 Caddyfile 文件中的
(@tag)字段最终会被 ${DRONE_TAG} 替代以生成对应版本的应用容器服务 通过 docker-compose 配置 api server、caddy server、mongo server 的参考链接有:
- Mongo: Docker Compose with example App & Mongo
- Mongo: go-mongo-docker-example
- Caddy: Caddy wordpress docker-compose
- Caddy: Docker compose localhost 502 error
- Caddy: [SOLVED] How to Configure Caddy in Docker Container (Getting Permission Denied)
- Caddy: Caddy recipe does not work using docker-compose.yml configuration
- Caddy: caddy-part3-docker-compose.yml
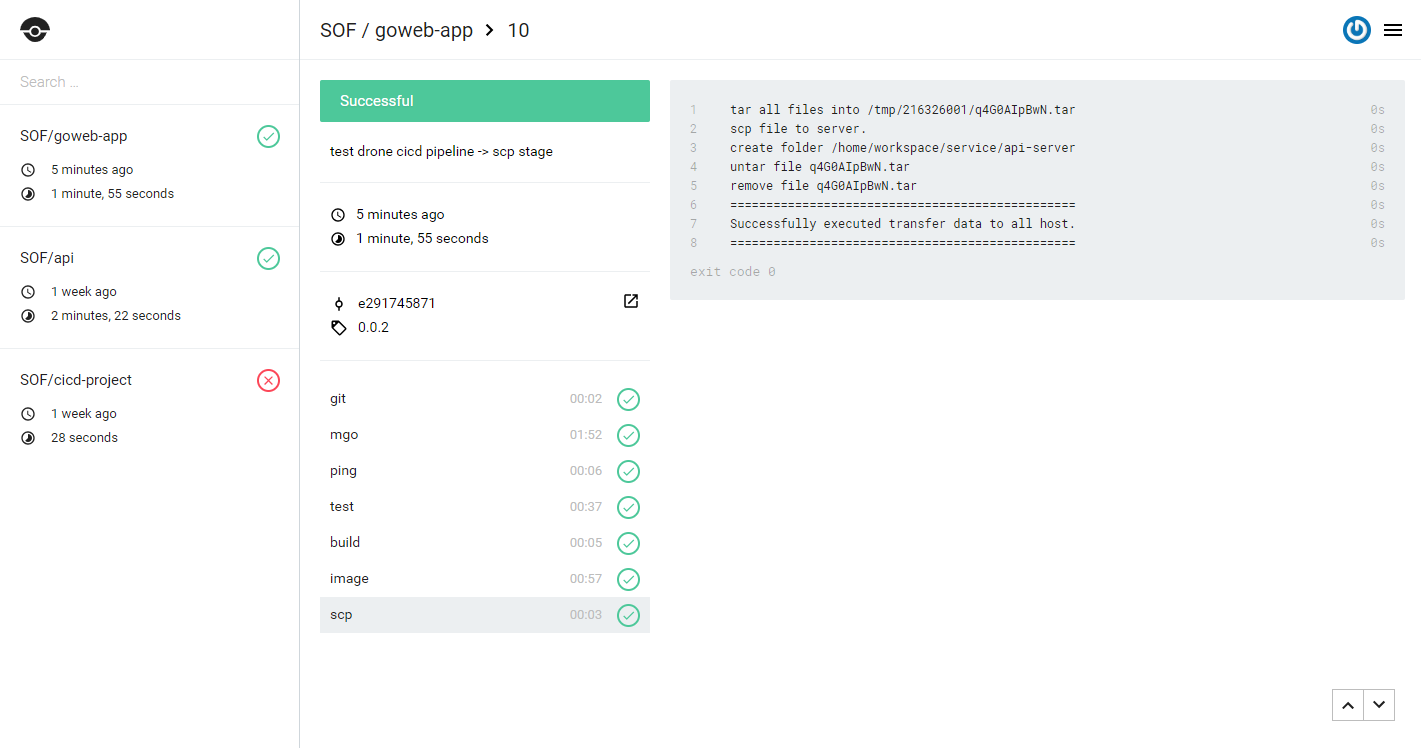
- Now, 提交代码进行测试(备注:Drone CI/CD 设定只在 master 和 以 release/ 开头的分支起作用)
1
2
3
4
$ git add -A && git commit -m "test drone cicd pipeline -> scp stage" && git push # 打 tag, 触发 when: [event: tag] 事件,即触发 publish_image 阶段执行 $ git tag 0.0.2 -m "release 0.0.2" && git push origin 0.0.2构建结果如下图:
Drone Pipeline: 服务部署(deploy)
一切准备好后,就可以执行容器服务部署了,主要包括:Caddy Server Container、Go Web Server Container、MongoDB Server Container,这一组应用容器服务通过 docker-compose 进行管理和组织。
此时的
.drone.yml配置如下:1 2 3 4 5 6 7 8 9 10 11 12 13 14 15 16 17 18 19 20 21 22 23 24 25 26 27 28 29 30 31 32 33 34 35 36 37 38 39 40 41 42 43 44 45 46 47 48 49 50 51 52 53 54 55 56 57 58 59 60 61 62 63 64 65 66 67 68 69 70 71 72 73 74 75 76 77 78 79 80 81 82 83 84workspace: base: /go path: src/repo/goweb-app clone: # Clone code from bitbucket git: image: plugins/git depth: 50 tags: true pipeline: ping: # Mgo-server for testing restful api image: mongo:latest commands: - sleep 3 - mongo --host mgo --eval "{ping:1}" test: # Golang unit testing image: golang:latest group: build environment: - BRC=${DRONE_COMMIT_BRANCH} - SHA=${DRONE_COMMIT_SHA:0:8} - EVN=${DRONE_BUILD_EVENT} - MSG=${DRONE_COMMIT_MESSAGE} - TAG=${DRONE_TAG} - MGO=mgo:27017 commands: - cd cicd - /bin/sh test_api.sh $MGO $BRC $SHA $EVN $MSG $TAG build: # Build go app and package source files image: golang:latest commands: - cd cicd - /bin/sh build_app.sh image: # Build image and publish to private registry image: plugins/docker repo: repo.company.com:5000/go-app registry: repo.company.com:5000 secrets: [ docker_username, docker_password ] context: ./cicd/ dockerfile: ./cicd/Dockerfile default_tags: true when: event: tag scp: # Upload resource and config files to remote server image: appleboy/drone-scp group: build host: - your_server_address username: root port: 22 secrets: [ ssh_password ] target: /home/workspace/service/api-server # 远程服务器目录 source: ./cicd/release.tar.gz # 随镜像一起发布的文件 when: event: tag + deploy: # Deploy api-server, caddy-server, mgo-server + image: appleboy/drone-ssh + host: + - your_server_address + username: root + port: 22 + secrets: [ ssh_password ] + command_timeout: 60 + script: + - cd /home/workspace/service/api-server/cicd + - tar -zxvf release.tar.gz + - ls -l + - /bin/sh deploy_services.sh ${DRONE_TAG} ${DRONE_COMMIT_SHA:0:8} + when: + event: tag services: # Dependent service mgo: image: mongo:latest branches: # Enable Drone CICD on: master & release/* branches include: [ master, release/* ]Note:
- Drone Plugins: appleboy/drone-ssh 用来连接到远程服务器
- deploy_services.sh 是执行服务部署的脚本,需要接收 ${DRONE_TAG} 用来动态构建容器名称等
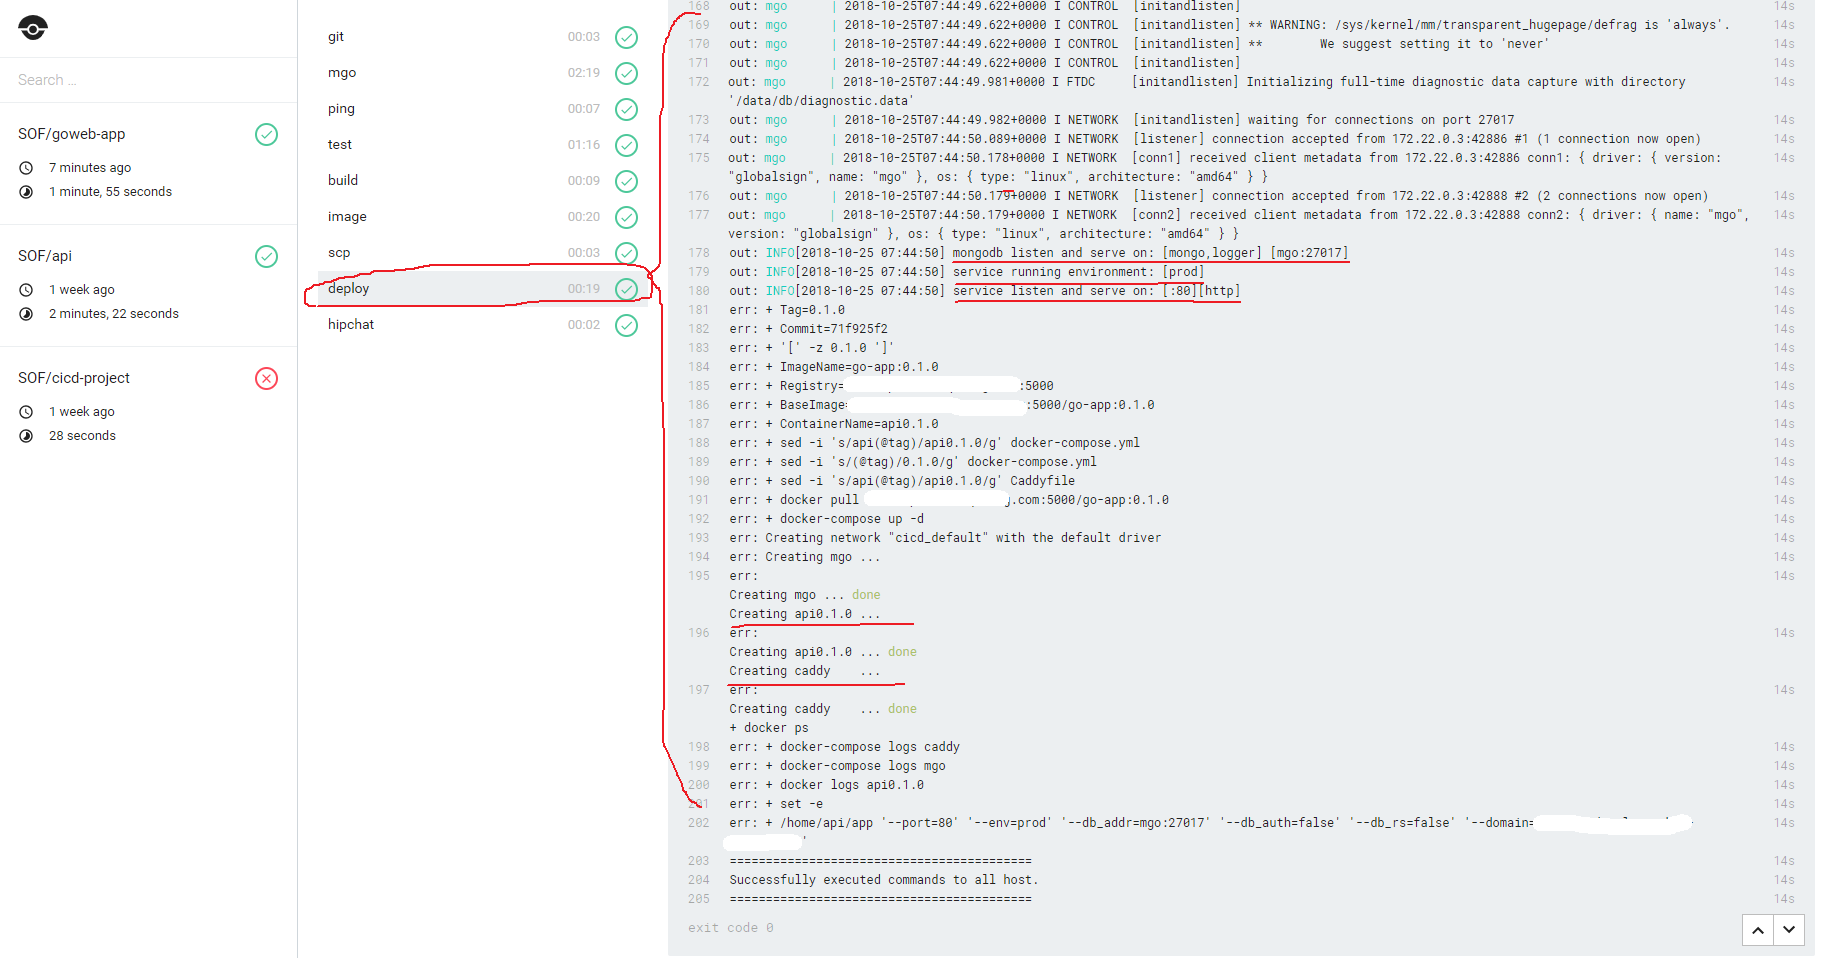
- Now, 提交代码进行测试(备注:Drone CI/CD 设定只在 master 和 以 release/ 开头的分支起作用)
1 2 3 4$ git add -A && git commit -m "test drone cicd pipeline -> deploy stage" && git push # 打 tag, 触发 when: [event: tag] 事件,即触发 publish_image 阶段执行 $ git tag 0.0.3 -m "release 0.0.3" && git push origin 0.0.3构建结果如下图:
Drone Pipeline: 结果通知(notify:hipchat)
为了确保能够及时获取 Drone CI 构建结果,需要选取一种合适的方式来接收通知,这里集成了我们在用的 hipchat.
此时的
.drone.yml配置如下:1 2 3 4 5 6 7 8 9 10 11 12 13 14 15 16 17 18 19 20 21 22 23 24 25 26 27 28 29 30 31 32 33 34 35 36 37 38 39 40 41 42 43 44 45 46 47 48 49 50 51 52 53 54 55 56 57 58 59 60 61 62 63 64 65 66 67 68 69 70 71 72 73 74 75 76 77 78 79 80 81 82 83 84 85 86 87 88 89 90 91 92 93 94 95 96 97workspace: base: /go path: src/repo/goweb-app clone: # Clone code from bitbucket git: image: plugins/git depth: 50 tags: true pipeline: ping: # Mgo-server for testing restful api image: mongo:latest commands: - sleep 3 - mongo --host mgo --eval "{ping:1}" test: # Golang unit testing image: golang:latest group: build environment: - BRC=${DRONE_COMMIT_BRANCH} - SHA=${DRONE_COMMIT_SHA:0:8} - EVN=${DRONE_BUILD_EVENT} - MSG=${DRONE_COMMIT_MESSAGE} - TAG=${DRONE_TAG} - MGO=mgo:27017 commands: - cd cicd - /bin/sh test_api.sh $MGO $BRC $SHA $EVN $MSG $TAG build: # Build go app and package source files image: golang:latest commands: - cd cicd - /bin/sh build_app.sh when: event: tag image: # Build image and publish to private registry image: plugins/docker repo: repo.company.com:5000/go-app registry: repo.company.com:5000 secrets: [ docker_username, docker_password ] context: ./cicd/ dockerfile: ./cicd/Dockerfile default_tags: true when: event: tag scp: # Upload resource and config files to remote server image: appleboy/drone-scp group: build host: - your_server_address username: root port: 22 secrets: [ ssh_password ] target: /home/workspace/service/api-server # 远程服务器目录 source: ./cicd/release.tar.gz # 随镜像一起发布的文件 when: event: tag deploy: # Deploy api-server, caddy-server, mgo-server image: appleboy/drone-ssh host: - your_server_address username: root port: 22 secrets: [ ssh_password ] command_timeout: 60 script: - cd /home/workspace/service/api-server/cicd - tar -zxvf release.tar.gz - ls -l - /bin/sh deploy_services.sh ${DRONE_TAG} ${DRONE_COMMIT_SHA:0:8} when: event: tag + hipchat: # Notify + image: jmccann/drone-hipchat + url: https://hipchat.your_company_domain.com + room: 19 + auth_token: tWVtsTFzsbkwSJO79JHcyb11TR8dLyEYAlicHviB + from: Drone + when: + status: [ success, failure ] + template: > <strong>{{ uppercasefirst build.status }}</strong> <a href=\"{{ system.link_url }}/{{ repo.owner }}/{{ repo.name }}/{{ build.number }}\">{{ repo.owner }}/{{ repo.name }}#{{ truncate build.commit 8 }}</a> ({{ build.branch }}) by {{ build.author }} in {{ duration build.started_at build.finished_at }} </br> - {{ build.message }} services: # Dependent service mgo: image: mongo:latest branches: # Enable Drone CICD on: master & release/* branches include: [ master, release/* ]Note:
- when 设定条件
status: [ success, failure ]:不管构建成功还是失败都会发送通知到指定的 Rooms - template 配置可以参考这篇文章:http://ashphy.hateblo.jp/entry/drone-hipchat-plugin
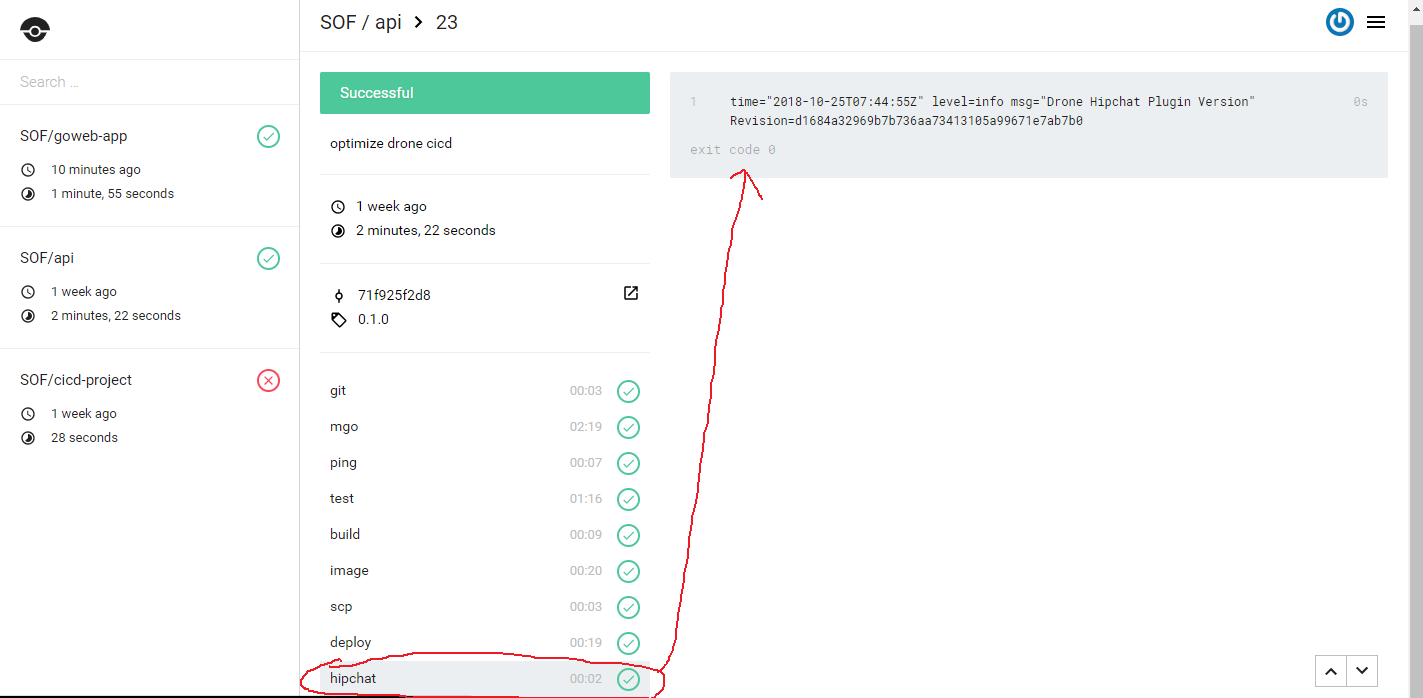
- Now, 提交代码进行测试(备注:Drone CI/CD 设定只在 master 和 以 release/ 开头的分支起作用)
1$ git add -A && git commit -m "test drone cicd pipeline -> notify stage" && git push- when 设定条件
构建结果如下图:
至此,一套完整的 Drone CI/CD Pipeline 流已配置完成。
最终完整的项目结构如下:
|
|
See Also
Thanks to the authors 🙂
- Medium: Continuous Delivery with Drone CI
- Medium: 使用 Docker & Drone 建立簡易自動部署流程 — Part2
- Drone 搭配 Kubernetes 部署 Go 語言項目
- Example: go-training/drone-golang-example
- Drone 持续集成实践 - 基于 Gogs,以 Golang 为例
- 扩展阅读: 私钥登录原理 + 添加secrets + 安装drone cli
FAQ
Q: go: golang.org/x/crypto@v0.0.0-20180904163835-0709b304e793: unrecognized import path “golang.org/x/crypto” (https fetch: Get https://golang.org/x/crypto?go-get=1: dial tcp 216.239.37.1:443: i/o timeout) go: golang.org/x/sys@v0.0.0-20180905080454-ebe1bf3edb33: unrecognized import path “golang.org/x/sys” (https fetch: Get https://golang.org/x/sys?go-get=1: dial tcp 216.239.37.1:443: i/o timeout) go: error loading module requirements